This is a description on how to deploy a Juniper LAB of 8 vMX routers and making a simple topology in VMware vSphere environment. vMX is Juniper’s virtual production router so this could be the same procedure for deploying vMX device in production except different number of routers and their interconnection with vSwitch setup.

Two VMs interconnected with VLAN801 – making one Juniper vMX router
As you might have seen from my previous post, I’m trying to get into Juniper configuration lately. One of the things that I needed is to set up a simple lab running Juniper vMX machines with multicast forwarding enabled.
It was a simple lab experiment with few commands on each device. As it turns out, being a Cisco fellow, each of those commands presented a complicated googling routine until the thing finally started to work.
Most time I spent configuring Virtual Machines and boot them properly, after that Juniper Configuration Guides were enough to make fist lab scenarios.
Googling went somewhat like this:
- How to set up Juniper vMX on Vmware ESXi 6.0 and interconnect 8 instances of vMX?
- How to configure Vmware network and vSwitches to make this work?
- How to configure VCE and VPE vMX Control and Forwarding plane VM communication?
- How to configure interfaces and map them to VMware vSwitch interfaces?
- How to configure Juniper eth interfaces, OSPF, Multicast with PIM Sparse mode?
- Why this does not work from the first try? Do I need vMX Evaluation licence to do that?
- What for …. does ‘tunnel-services statement on one or more online FPC and PIC’ mean?
…so when it actually finally worked, I decided to share it so you can have one post that would describe it from start all the way to VLC Multicast streaming.
Previous post is describing the configuration of vMX routers to get IP addressing, routing and multicast routing working. In this one here I wanted to share with you how the actual VMware ESXi setup was made so you do not lose time with those few Juniper posts about it which are maybe not precise enough to make it in first try.
LAB Topology
In case I decide to enhance my Juniper-fu sometime soon I prepared my lab topology in a way that enables multiple paths from Server1 (on the left side) to Server2 (on the other side). In this way it will be possible to test multicast forwarding and multicast traffic engineering by sending streams for different groups across different paths.
I also put on each side one Windows 2K12 machine and one Cent OS 7 machine. It give me more options for which tools I could use to test because some of them are Linux only and some work only from Windows. Lab environment that can test both Linux and Windows servers as end hosts is always a nice thing to have.

Juniper vMX LAB for multicast Topology
Deploying Juniper vMX routers in VMware

Deploy OVF Template
Deploying Juniper vMX routers in VMware (Junos version 16.1R1)
- In ESXi Datastore create separate folder for each VCP and CFP: Juniper vMX CP 1 … 8, Juniper vMX FP 1 … 8 in my case.
- Download vMX ESXi from juniper.net website
- Extract that thing and you will see “vmdk” folder where all your disk are
- Upload first vmdk ( junos-vmx-x86-64-16.1R1.7.vmdk ) into “Juniper vMX FP 1” folder
- Upload other three vmdk files ( metadata_usb.vmdk | vFPC-20160617.vmdk | vmxhdd.vmdk ) into “Juniper vMX CP 1” folder
- Now copy those files to all other folders Juniper vMX CP 1 … 8, Juniper vMX FP 1 … 8 respectively.
- Start the VMs creation with following steps:
Creating VCP – Control Plane VM:
- File -> New -> Virtual Machine in VSphere Console
- In the Wizard’s fist step select: Custom VM
- In the next step: Name the VM: “Juniper vMX CP 1” – or something similar to let you know later that his is a Control Plane VM of your first vMX router
- Select the Datastore where your Folders with vmdk files are and save the VM there.
- Select Virtual Machine Version 8
- Select Other 64-bit version of OS
- Select 1 vCPU
- Select 2GB of RAM
- Leave networks for now, we will set them up later
- Select LSI Logic Parallel SCSI controller settings
- Map disks from VCS datastore folder selecting: Use an existing virtual disk
- Map the “vFPC-20160617.vmdk” first.
- Select the Edit virtual machine settings before completion check box and click Continue
- Add Additional disk: “vmxhdd.vmdk”
- Add another disk: “metadata_usb.vmdk”
Please keep in mind that those disks must be mapped in this exact order.
Creating VFP – Forwarding Plane VM:
- File -> New -> Virtual Machine in VSphere Console
- In the Wizard’s fist step select: Custom VM
- In the next step: Name the VM: “Juniper vMX FP 1” – or something similar to let you know later that his is a Forwarding Plane VM of your first vMX router
- Select the Datastore where your Folders with vmdk files are and save the VM there.
- Select Virtual Machine Version 8
- Select Other 64-bit version of OS
- Select 3 vCPU
- Select 8GB of RAM
- Leave networks for now, we will set them up later
- Select LSI Logic Parallel SCSI controller settings
- Map disks from VCS datastore folder selecting: Use an existing virtual disk
- Map the “junos-vmx-x86-64-16.1R1.7.vmdk” first.
After making 8 VM of each type we will have something line this visible in VMware vSphere console:

This topology is running 8 vMX routers and 4 Servers. 8 vMX routers are visible as 8 VCP + 8 VFP VMs
We can now go on and start interconnecting them, using vSwitch configuration, in order to get our LAB topology working.
Preparing VMware vSwitch Networks for this topology
Juniper vMX router is virtual router which needs two VMs to run. First VM is VCP – Virtual Control Plane VM and the second VFP – Virtual Forwarding Plane VM. If we compare this to normal chassis router it is like having VCP for Management (something like supervisor) and each VFP presenting a line card of that switch chassis. In our case we deployed 8 VCP VMs of each type in previous chapter and now we need to connect each VCP to one VFP making 8 functional vMX devices.
Topology looks like this if we show all VMs making the topology above:

vMX VPC and VFP VMs interconnected with vSwitch VLAN configuration
VMware configuration is done with 3 Standard vSwitch:
- MGMT vSwitch (Demolab vSwitch)
- This switch, with connection to outside world, is used for Management of routers. Using this connection, routers will be reachable from my local LAN and I will not need vSphere Console to connect to them and manage them. I will simply ssh to them.
- Juniper MGMT VLANs
- Each VLAN from this switch is used for the interconnection of VCP VM with VFP VM. Making this connection we are connecting Control Plane with Forwarding plane and Juniper vMX router is them ready to be turned on. Interconnection of this kind are visible in the topology above as VLAN 801 to VLAN 808.
- Juniper TRAFFIC VLANs
- VLANs on this vSwitch are configured to interconnect Juniper routers effectively creating our topology and enabling inter-Router communication. Each VFP forwarding plane has two or three vNICs in those VLANs creating the data plane. Those VLANs are in the topology above VLANs 9xx, VLAN26, VLAN75
To give you and example, here we have configuration of vMX 1. You can see that first image is showing VCP VM provisioned with 2GB RAMs and 1 vCPU. The only two NICs on every VCP are “DemoLab” for mgmt access to that router and “Juniper mgmt VLAN 801” which will connect this VCP to below showed VFP.
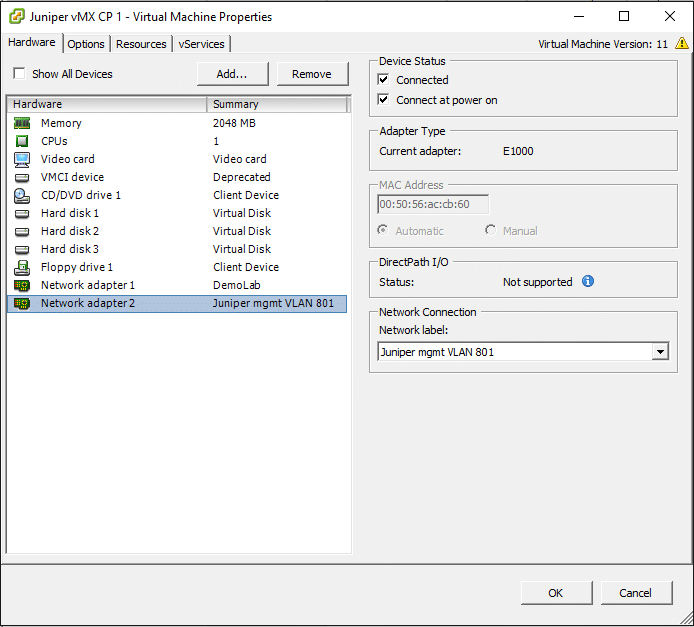
vMX VCP VM Configuration
The second image is showing VFP VM provisioned with 8GB RAM and 3 vCPUs. Forwarding Plane VM – VFP has three disks mapped and also few vNICs. First NIC is like in all other VMs “DemoLab” for mgmt access on that router (That router’s forwarding and all configs will be done from VCP VM so if you like you can remove that vNIC from VFP VMs.). Next NIC is in VLAN 801 to interconnect him with above showed VCP. All other vNICs are connecting this VFP to other VFP VMs creating our topology.

vMX VFP VM Configuration
From here on, you can start to turn on the VMs and connect to them with vSphere Console. When connected to VCP VMs you should see that forwarding plane is detected and connected automatically to your VCP with command:
show chassis fpc
If this is working then:
show interface terse
The last command should show your ge-0/0/0, ge-0/0/1 .. etc. interfaces if VCP-VFP communication is working.
The first step after that if to find fxp0 interface and configure MGMT IP address from range available on your local network (DemoLab network in my case). After this interface is configured and static route to your notebook subnet is configured you should get access to that router via ssh.
More info in my first blog post about configuration of Juniper devices can be found here. For questions, leave a comment.
Nice one Valt 🙂 Is this thing working in Hyper-V as wall?
Hi Banko,
There’s no Microsoft Hypervisor mentioned in the datasheet http://www.juniper.net/assets/us/en/local/pdf/datasheets/1000522-en.pdf
I suppose it should work but it’s not supported. Give it a try and let me know 😉
Did anyone ever get vMX working in Microsoft Hyper-V environment ?
Very well written & detailed post. Many thanks.
What kind of server did you use to set this up? Is this a home lab or something at your work. I am getting started at my new job with Juniper gear and wanted to setup a home/work lab to get familiar with the cli and configs.
Hi Nick,
It was actually done at work as a part of a preparation for a project and we wanted to test multicast and if multicast features will affect some other features running on our routers.
For my example, it was done with vMX Juniper image of production virtual router and it was deployed on a Vmware host with more that 256 GB of RAM. In this case I needed 10GB of RAM for each vMX router (2GB for Control Plane VM and 8GB for Forwarding plane VM).
If it is for home lab I would suggest to go with GNS3 which can run Juniper router with basic functionality and it will need considerably less RAM to run. Other option is to try Junosphere which will give you the access to vMX lab setup in Juniper cloud. It is not free but if you go through Juniper education (Juniper Champion program) you can get free access to Junosphere if you reach certain Champion level. It’s quite fun, ask you employer to get you an partner access to that part.
Have fun!
I am trying to connect vcp with vfp and then connect to 2nd router.
when i perform show interface terse i dont see the ge-* interfaces …
how come? any ideas?
root@vMX-WAVE-01> ping 128.0.0.16 routing-instance __juniper_private1__
PING 128.0.0.16 (128.0.0.16): 56 data bytes
64 bytes from 128.0.0.16: icmp_seq=0 ttl=64 time=0.620 ms
64 bytes from 128.0.0.16: icmp_seq=1 ttl=64 time=0.379 ms
64 bytes from 128.0.0.16: icmp_seq=2 ttl=64 time=0.396 ms
64 bytes from 128.0.0.16: icmp_seq=3 ttl=64 time=0.498 ms
64 bytes from 128.0.0.16: icmp_seq=4 ttl=64 time=0.457 ms
64 bytes from 128.0.0.16: icmp_seq=5 ttl=64 time=0.454 ms
^C
— 128.0.0.16 ping statistics —
6 packets transmitted, 6 packets received, 0% packet loss
round-trip min/avg/max/stddev = 0.379/0.467/0.620/0.079 ms
Hi,
With “show chassis fpc” you should see that your VCP can speak with your VFP VM. If not, make sure you are not connecting more VCPs and VFPs with same VLAN. Use one VLAN for each VPC-to-VFP connection.
Maybe your VFP is not configured with one or more vNICs on Vmware so there is nothing to show.
If that is not the case, you can always try to reboot both VMs and see if that helps.
Hi Raymond, I am having the same issue, Did you fix this?
Thanks
Are those vmdk files named incorrectly? It is quite counterintuitive to use vFPC vmdk for vpc and junos vmdk for vfpc..
I followed your instructions with 16.1R2. vpc booted into wind river linux with root/root (password not documented anywhere), with no junos. vfpc does not boot at all and nothing on console/serial.
imo the vMX documentation is really bad
Hi,
This article was written for 16.1R1 and in that release you get .vmdk files to use with custom created VMs for VCP and VFP.
I agree that is counterintuitive to use “vFPC-20160617.vmdk” for VCP (Control Plane) VM but this is exactly what they did. If you download 16.1R1 you will se that the vmdk file is named that way.
I see that in the newer versions you will get .ova files only, there are no .vmkd files in the zip file.
I will try to test and see if there is any difference in deployment of newer versions and update the article if that’s the case.